Serving and Serve Strategy
When you have the serve, you are in the front court, your opponent is as far away from the front wall as it is possible to be, you have the ball in your hand, and you can drop and hit a wide variety of shots. The server has every advantage. Try not to waste this opportunity.
Your goal as the server is to (1) ace your opponent for a point, (2) generate a weak return, or (3) generate a defensive (ceiling ball) return. Obviously an ace is preferable, but aces are low percentage shots. The second best outcome is a weak return. Since you are in front of your opponent (who is in deep court), you have a good chance to end the rally with a kill shot or pass. This is the three shot rally. It is almost as good as an ace. If your opponent hits a ceiling ball, then you have to rally. What you do not want to do is give the receiver an offensive opportunity.
First Serve
I recommend hitting a drive serve as the first serve. If you hit the
first serve short, you get a second serve. On the other hand if you hit
the drive serve long, it is very likely to
rebound off the back wall giving your opponent an offensive shot. You
have given up all the advantages of having the serve. Therefore, your
goal is to hit the first (drive) serve short. That way you have little
chance of hitting the ball long off the back wall and you have a decent
chance of getting the ace or a weak return. The most likely thing is
that you actually do hit the first serve short. However, if this
happens you still have a second serve. See the discussion of drive serve targets below.
How to hit a drive serve: the two-step service motion
The server must stay within the five-foot wide service box. I
recommend
the two-step service motion which allows you to make the best use of
this restricted space. I am going to assume that you are right handed.
Lefties will have to make the necessary translation. Start by placing
your left foot just touching (not over) the short line with the toes
facing the side wall. Place your right foot
behind your left foot also just touching the short line so that you are
comfortably balanced. I like to turn my back (right) foot slightly so
that the
toes are on the short line, but facing diagonally toward the back wall
so that I don't feel like I am walking a tightrope. Start the service
motion by taking a small step with your back foot toward the front
wall. At the same time raise your racquet arm to shoulder height
(with the wrist cocked)
and bounce the ball one to two feet from the front foot-fault line.
Take a big step with your front (left) foot so that you step on, but
not completely over, the foot fault line. Keep your toes pointed toward
the right front corner. Your swing mechanics are the same as for any
forehand. (See the Stroke Tutorial.)
You should contact the ball
near your front foot at the foot fault line. Keep
your right elbow up as you drop the ball. A good forehand stroke is the
best way to generate power on the serve.
The problem with learning this technique is that, after you set your feet, everything happens at once. In aerobics class the service motion is called the grapevine. To practice it without a ball, put one foot behind the other, take the grapevine step while simultaneously raising both arms with the elbows bent. Think of it as a dance step. Doing this a few times should make your muscles familiar with the movement. Add a ball bounce with your left hand and, eventually, a forehand swing. Now you're doing the racquetball two-step.
The two-step delivery builds momentum toward the front wall and allows your upper body to rotate slightly toward the back wall (allowing more hip and shoulder rotation). The additional momentum and rotation combine to produce more power.
Relocating to center court
Part of the service motion is relocating to center court after the serve. Just after you hit the ball, you are at the 15 foot line, way too far forward. You have to relocate as quickly as possible to somewhere around the dotted line in center court. Simply push off the front foot and shuffle or run back to the dotted line, keeping eye on ball. Keeping your weight back is good form anyway, but for the serve it also allows you to relocate quicker to center court. Keeping your head down keeps the ball down. Following through below shoulder level keeps the swing flat (helping to keep the ball low), and following through with the face of the racquet down puts natural top spin on the ball, helping it to bounce twice.
Keep eye on ball
Keeping your eye on the ball tells you what your opponent is up to in the back court so you can anticipate her shot or simply get out of the way. (If the ball comes off the side wall to the middle of the back court, you will have to move to one side or jump to avoid a penalty hinder. If you are not watching the ball, you will often be guilty of a hinder, be hit by the ball, or force your opponent into a shot she shouldn't have to take, all of which are bad.)
Three serving positions
You should vary your serves by serving from different positions.
There are three prime positions in the service box. The first location
is 8 feet from the left side wall. This gives you the best chance to
momentarily (and legally) obscure your
opponents view of the ball on the drive serve to the backhand. In panel
courts the bottom panel is 8 feet wide and 4 feet high, so line up with
the
vertical line at the end of the first bottom panel.
In plaster courts, the 8 foot line is approximately at the left hand
edge of the door, assuming the door is in the center of the court.
On courts with glass back walls, the second supporting fin is
usually 8 feet from the right as you face the back wall, so you can
line yourself up by observing that, when you are at the 8 foot line,
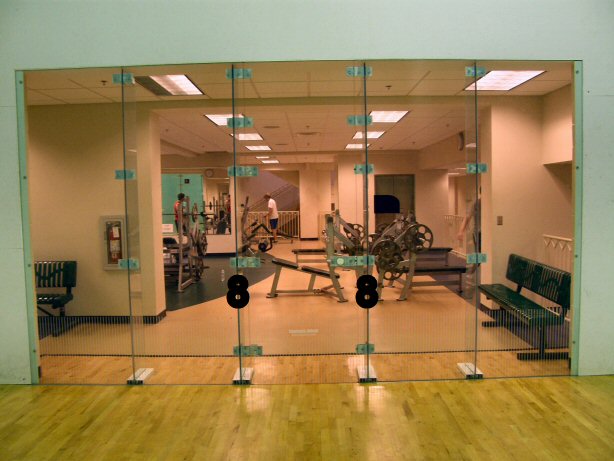
you can only see the edge of the fin. See the photo below where I have
superimposed the right hand 8 at the eight foot supporting fin.
.
The center position, 10 feet from the left side wall places you
directly in front of the receiver. This position makes it difficult for
the receiver to see where the ball hits on the front wall. Finally, in
the right
of center position, line up 8 feet from the right side wall. This
position momentarily and legally obscures the drive serve to the
forehand. Courts with a glass back wall will usually have a supporting
fin at this point (the left hand 8 in the above photo). Lining up by
looking
at the back wall has the advantage of checking that your receiver is
ready at the
same time.
In any of
these positioins, be careful that the ball does not pass too close to
your body for a screen serve. A good
rule is that if the ball hits the side wall or goes directly into one
of the back corners, it cannot be a screen.
Serve mechanics: drop or bounce?
The ball drop is very important.
There are essentially two theories. Some players drop the ball and hit
it when it reaches its highest point about a foot or so off the floor.
The advantage to this approach is that the ball is not moving when you
hit it and therefore presents an easy target. The second theory is that
you should bounce the ball so that it rises 2-3 feet off the
floor. The ball is hit as it is falling. This is a somewhat harder
target because the ball is moving, however, the bounce method gives the
server a little more time to hit the ball and it makes it easier to get
the ball out over the foot fault line. For these reasons, I recommend
the ball bounce over the ball drop.
To see a short video showing a number of pro drive serves, click here. Note that all these pros use
essentially the same ball bounce and service motion.
Take your time
Whenever you serve, you should take your time. Go through the same checklist every time: (1) Visualize your serve. (2) Check your receiver. (3) Place your feet properly at the short line. (4) Check your front wall target. (5) Find the point on the floor where you are going to bounce the ball. (6) Begin your service motion. (7) Hit the ball. (8) Shuffle back toward the dotted line while watching the ball.
Be deceptive
Try to have the same service motion and foot work no matter which
serve you hit. Be consistent on the ball bounce and be sure to bounce
the ball so that you strike it around the foot fault line. This makes
it difficult for the receiver to anticipate the serve and generates the
most power.
Hitting the serve “inside out”
Drive
serve
targets
Finding the target
So, to hit the ball directly into the back corner,
we have to find the correct point on the front wall.
Here
is a photo of my home court at William and Mary. Going from left to
right on the bottom row
of
panels, there are two eight foot panels
and one four foot panel. The
second row
starts at the left with a four foot panel then has two eight foot
panels. You
can use the cracks between the panels to estimate the distance from the
side
walls. I have superimposed some distance markers along the bottom of
the wall.
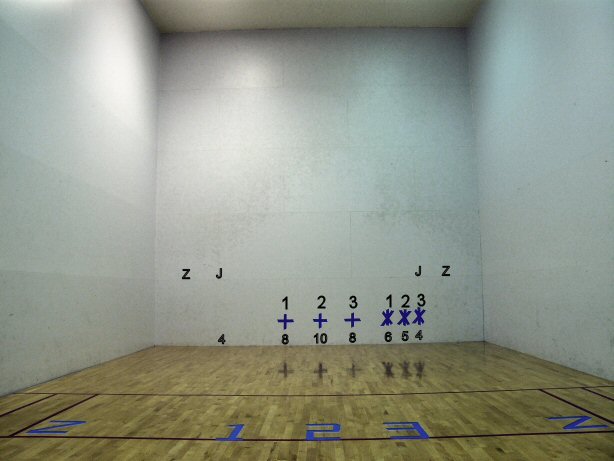
The three prime serving positions are labeled 1, 2, and 3 and are 8
feet from
the left side wall, in the middle (at 10 feet) and 8 feet from the
right side wall. The Z's denote serving positions that are used
primarily for Z-serves (later).
Assume you are
located in the center serving position (position 2) and you want to hit
a drive
serve directly to the left side back corner, to a right handed
receiver's backhand. (I am assuming you are right handed and are using
the two-step service motion. Lefties will
have to make the necessary translation.) With your feet in
position,
but before beginning the service motion, find the point on the front
wall directly in front of the mid line of your body. Since you are in
the center position, this point will correspond to the mid line of the
front wall. This point is two feet from the end of the first bottom
panel
and corresponds to the cross labeled 2 at the 10 foot marker in the
photo. (Plaster courts
typically have a lot of chips and marks around this point, for
obvious reasons. If you are practicing on your home panel court, you
can use some blue painter’s tape to mark the point. Just make sure you
remove the tape when you are done.) This is your target. If you use
good stroke mechanics, a ball that
hits this point will tend to rebound directly to the left rear corner.
How high is the target from the floor?
You want the ball to take its first bounce just
over the short line, but not come flying off the back wall. The harder
you hit
the ball, the lower on the front wall you should place the target. The faster the walls, the lower the target.
Plaster walls are generally faster than panel walls and usually require
a lower target. The horizontal pieces of painter's tape in the photo
above are 18 inches high, but anywhere between one and two feet will be
fine. When I play on plaster courts, I use a target between 12 and 18
inches high. Experiment with serves that are higher and lower to
find the right level.
Hit some practice serves using the target and see how many are good.
Make adjustments as necessary. Even if you hit the target, the ball
will not always do the same thing because there are several other
variables in the equation. The ball drop is very important. If you are
not consistent in your ball drop, your contact point will vary, the
angle will change, and the ball will do something different every time.
Try to be consistent with your ball drop. The second thing that varies
is the angle of the face of the racquet as it contacts the ball. A
small change in the racquet face angle can make a big change in where
the ball goes. Finally, if you contact the ball with different parts of
the racquet face you will put spin on the ball. As a result, the angle
at which the ball comes off the front wall will change. Try to contact
the ball at or near the foot fault line. This maximizes power and
reduces the chances of hitting the ball with too much spin or with a
variety of
racquet face angles. You will hit more powerful and more consistent
serves.
Drive serve to the right side
Serving from the right and left positions
To vary the serves and keep the receiver off
balance, try serving from the left and right positions as well as the
center. To serve from the left position (position 1 in the photo), line
up 8 feet from the left side wall. You
can use the crack line in the panels that are 8 feet from the left
side to help you line up or line up using the 8 foot supporting fin on
a glass back wall. Before beginning the service
motion, locate the point on the front wall
directly in front of the mid line of your body, 1-2 feet up from
the floor. This is the target for the drive serve to the backhand. This
point
should be approximately eight feet from the right hand side wall and
should correspond to a vertical line on a panel court on the
first row. In the photo it is the cross just above the left
8 (labeled 1). The target for the serve to the right is half way
between
the backhand target and the right hand side wall, approximately 6
feet from the right side wall (the asterisk labeled 1 in the photo).
If you use correct serve mechanics and hit the correct target, the ball
should travel into the back
corner. A perfect drive serve bounces twice before it reaches the back
corner.
Z and jam serves
You should also mix in Z's and jams to keep the receiver from locking on to your drives. Also, some players just have trouble with these serves. The Z and jam are also good choices if your opponent is tired because tired players don’t want to move. Both these serves make your opponent move his feet. Obviously, if your opponent is getting good returns off your attempted aces, use more jams and Z’s.
Targets for the Z and jam serves
The targets for the Z and jam serves will depend on your position,
how hard you hit,
and the type of wall. It will take some experimentation to find the
best target. It is quite difficult to hit a Z from the center position.
The easiest position from which to hit a Z to the backhand is from the
extreme left (the left hand Z on the
floor in the photo) hitting the right Z target on the front wall (about
four feet up, at the top crack of the bottom panel, and two feet out
from the right side wall), so that the serve goes
toward the left side wall (bouncing before it reaches the wall),
rebounds off the wall, and goes parallel along the back wall.
To hit the Z serve to the receiver's forehand, stand at the extreme
right position (the right hand Z on the floor in the photo). Your
target is again about 4 feet high and two feet out from the left side
wall
(the left Z on the front wall in the photo).
Note that you do not stand in the drive zone lane to hit the Z. To
do so will announce to your opponent that you will not be hitting the
ball down the line. One way to surprise your opponent is to
occasionally hit the down the line serve from the Z position, using the
same rule as above. (If you are four feet from the left side wall, your
target is also four feet from the left side on the front wall.) It will
not be a screen if it goes into the corner or hits anywhere on the left
side wall. You can also hit the ball into the right side back corner
using the target 8 feet from the right side wall.
For a jam serve to the backhand from the position 1, the target is a point four feet high and 4 feet out from the left side wall (the left hand J in the photo). The targets for positions 2 and 3 are just to the right of the left hand J in the photo.
For jam serves to the forehand, use the right hand J as the target.
Hit the jam serve at least at medium speed so that the receiver does not have time to adjust her position to avoid the jam.
Low, hard drive Z’s and
jams (where the target is only 2-3 feet up on the front wall) are
tricky
because they
tend
to come off the side wall into the receiver's hitting zone. This
creates
an offensive opportunity for your opponent. However, some players have
difficulty
returning a
low drive Z or jam and occasionally you can catch a crack or get the
ball to bounce twice before hitting the side wall. Be sure to really
hit the ball hard because the ball loses
momentum
when it hits the side wall and is very likely to be short.
Remember, these targets are approximate. They will depend on the court
surface, how hard you hit the ball, where you bounce the ball, if there
is any spin on the ball,
etc. Experiment and make
adjustments as necessary.
Crack serves
Crack serves go directly from the
front wall, bounce once, and then hit the side wall crack and roll out.
These are extremely low
percentage shots.
However, they do work every now and then. To hit a crack serve, move
your
target toward the side wall and hit the ball low on the front wall (one
foot high
on panels and six inches high on plaster). The serve is very likely to
be short and you also run the risk of the ball
rebounding into the hitting zone of the receiver, generating an
offensive
opportunity, so be careful with crack serve attempts.
Targets
for
lefties
If you are left handed and are serving to the left, use the rule that
your target is half way between your serving position and the left side
wall. So if you are in the center (position 2), your target is five
feet from the left side wall. To serve to the right rear corner. your
target is directly in front of the midline of your body. The rules for
Z-serves and jams are the same as for righties.Summary
Vary your position (hit from all
three positions and from the Z positions),
vary your serves (hit down the line drives and cross-court drives from
all
three positions; hit jam and Z serves),
vary the
speed and vary the height. Hit some inside out serves. Be deceptive. Be
able to
hit drives, Z’s and jams using the same service motion. If your
opponent
has an obvious weakness with respect to any of these serves, exploit it
until
he or she corrects it.
Second Serve
This is your last chance to put the ball in play. Your goal is now to generate a weak return while insuring that you do not hit a fault serve. Your best choice is a lob or half-lob.
Lob serve position
The best location for hitting the lob is to the left of center, position 1, at the eight foot line, so that you strike the ball exactly in the center of the court. This makes it relatively easy to hit the lob to either side by angling the face of the racquet. The idea behind the lob is to make the receiver hit the ball at waist level or higher. There is no point to trying to deceive your opponent. The lob is slow enough that the receiver has plenty of time to react.
Lob serve targets
The rule is the same as for drive serves. For serves to the left your target is anywhere on the vertical line directly in front of the midline of your body (the 8 foot line). For serves to the right corner (to lefties) hit anywhere on the line half way between your body and the right side wall. Here is a photo of the same front wall as above with some lob serve targets superimposed.
Standard lobs and half-lobs
Assuming you are standing in the left of center position, the X's on the left hand side will correspond to the mid line of your body. Serves hit anywhere on this vertical line should rebound directly into the back corner. Lobs that hit the front wall 6 to 12 feet high will be half-lobs. Lobs hit higher than 12 feet will be standard lobs. Your goal is to get your lob to hit the floor in front of the dotted line, so it is difficult to cut off, and to take its second bounce at the crack between the floor and the back wall, so that it is difficult to hit an offensive return. What you do not want to do is to hit the back wall so that the ball rebounds toward the front wall. This gives your opponent too good a chance at an offensive shot. Hit the lob and half-lob with the racquet face open (about a thirty degree angle). Bounce the ball about chest high. Lift the ball to the target using your shoulders. No wrist snap. Practice different lobs to get the right touch on the ball. Use the same left of center position for all your lobs (except the Z serve to the forehand) to reduce the number of variables.
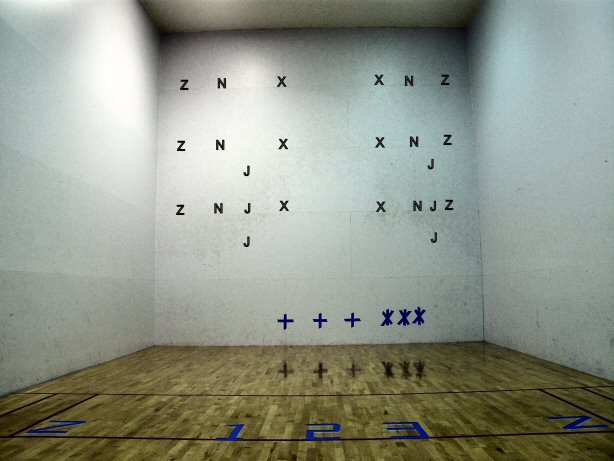
Nick lobs
Still standing in the left serving position, if your serve hits anywhere on the vertical line of N's on the left hand side, about 4 feet from the left side wall, the ball will strike the left side wall behind the dotted line, generating a "nick lob" that rebounds into the receiver's body and, presumably, generates a weak or defensive return. My first racquetball camp instructor, Jack Newman, made a living on the pro tour hitting only nick lobs.
Junk lobs
If you hit the front wall at one of the the left hand J's, you will generate a Jason Mannino "junk lob." The ball hits the floor around the dotted line, bounces up, contacts the side wall, somewhat deeper than the usual nick lob, and then rebounds into the back wall. It is a less predictable version of the nick lob. It can be hit at different levels and at different speeds. It is typically hit about 6-10 feet up just to the left of the mid line of your body. Jason Mannino, the number one player in the world for two years in a row, perfected the junk lob and uses it almost exclusively. Watch the following short clip of Jason Mannino’s junk lob serve. Note that he holds the racquet with an open face, almost a slice. It is a very effective serve against players who are cutting off your lob serves.
Lobs to right side
Still standing in the left position, you can generate the same serves to the right hand side of the court. (Alternatively, if you want to move to the center or right position, just move the targets correspondingly.) The right hand line of X's (six feet from the side wall, halfway between your body and the opposite side wall) will generate lobs that rebound directly to the corner. The right hand column of N's will yield nick lobs and the right hand J will generate junk lobs to the right side.
Lob
and half-lob Z serves
Hit the lob and half-lob Z's to the forehand (leftie's backhand)
from the right of center position. The target for the half-lob Z is
6-12 feet up and 2 feet from the left side wall. This serve can be hit
at a variety of
speeds. At higher speeds the ball bounce directly out from the side
wall. If hit well, the ball should hit the side wall deep and then
almost roll along the back wall. At slower speeds the ball will hit the
side wall and bounce diagonally toward the back wall jamming the
receiver.
The target for the lob Z is 2 feet from the side wall and 12 feet
up, or higher. (The top left hand Z in the photo.) The goal is to get
the ball to bounce near the dotted line, so it is hard to cut off,
contact the side wall high, and bounce diagonally to the back wall
where it dies.
The lob Z and half-lob Z to the
backhand is hit from the left position. The target for the half-lob Z
is a point 2 feet from the right side wall and 6-12 feet high (bottom
two right hand Z's in the photo). The target for the lob Z is two feet
from the right side wall and 12 feet up or higher. (Top right hand Z in
the photo.) I find
this serve is easier to hit using the backhand. Remember to
keep the racquet
face open.
Don't forget, these targets are approximate. Make adjustments as
necessary.
Second serve strategy
You should choose among lob serves depending in part on the receiver's actions. If the receiver is not attacking the serve, you should hit the standard lob or half-lob. The point of these serves is to get the ball deep in the back corner so that the receiver has to return the ball to the front wall from 39 feet while simultaneously dealing with two walls. If he or she is aggressively attacking your lobs (cutting them off and hitting offensive shots on the short hop or mid-hop), you should (1) adjust your delivery so that the ball bounces well in front of the dotted line or (2) hit the nick lob, the junk lob, or the half-lob Z so that the ball deflects off the side wall into the receiver at least waist high. The idea is to give the receiver a ball that is traveling slowly, that looks like a setup, but is really too high to shoot properly.
If you are playing in the Open division, you have only one serve. The strategy of trying to hit a short serve that might ace your opponent is not appropriate here. Open and pro players tend to hit more lobs and half-lobs for obvious reasons. They do hit drive serves but they hit their drives so hard that they are difficult to return even if they do come off the back wall.
Before the serve makes sure that you check your receiver. If you serve when the receiver has her racquet up, you are charged with a fault serve and you have wasted the first drive serve. After you hit the serve, you should hustle back and try to relocate to good center court position around the dotted line. Do not dawdle in the service box. Remember, if you are in the service box, you are in front of the dotted line and extremely vulnerable to a passing shot. Get back as quickly as possible. Because the drive serve goes so fast, you will probably not be able to get much past the dotted line before the serve is returned, but you should try to get at least to the dotted line. On a lob serve, you should be easily able to get to good center court position. Also, remember to keep eye on ball. Don't watch the front wall when the ball is behind you.
Players do not practice their
serves enough.
Practice your serves more, play less, play better.
More videos
Here are some longer videos of pros hitting a
variety of serves.
Pro drive serves
Pro
Z
serves
Pro lob serves